By managing rights, you can change your settings to control who can see and edit your folder and files on the network drive.
Is the drive set to WINFS1, WINFS2 or WINFS3? Then you can manage rights through Windows.
| Objective | Right to be set in the 'Allow' column |
|---|---|
| Reading access | Tick 'Read', 'Execute' |
| Writing access | Tick 'Modify' |
| Managing rights | Tick 'Full Access' |
You have the option of setting up an administrator for your drive. Add the ZIM ID of the desired administrator as described in 'Step 2: Issuing Rights' and set the authorisation to 'Full Access'.
Besides individual people, a group (= employee of the institution) that shares use of the drive is usually contained. You can remove the 'Full Access' right from this group if you want only the administrator to be able to edit the access rights.
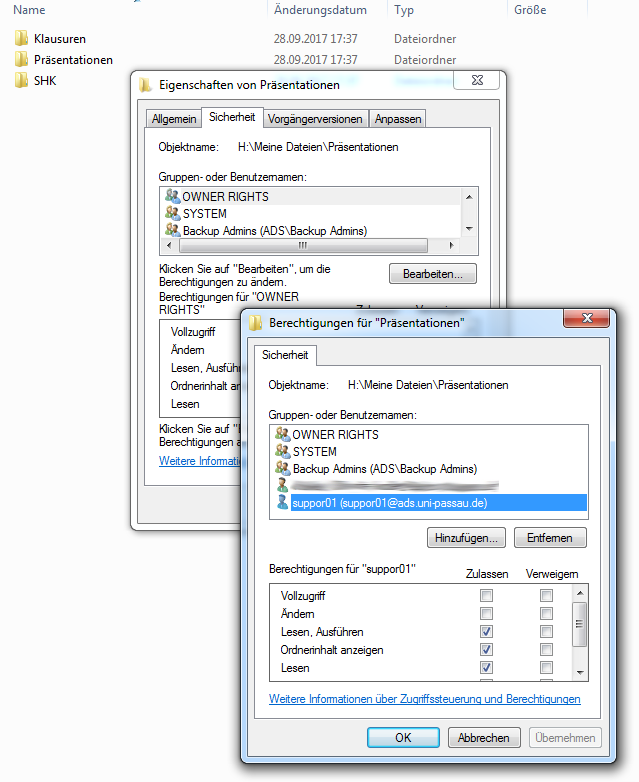
Right-click on the desired folder. Select 'Properties'. In the 'Security' tab, click on 'Edit'.
You can use 'Add' to add new people or groups. Type the person’s ZIM username or the group description (e.g. example01 for a person and S001 for a group) into the field, then click 'Check Name'. If more than one person or group is found, you can now select the person or group from a list. For groups, please always select the group description, without the _Team at the end. Confirm the change with 'OK'.
When do you add a group? If you would like to give access to a Section or a Division, for example, you can enter the group, without needing to add every person manually. The group description can name a person for you, such as through their being displayed in the I: drive, or if the person logs into the online administration of the ZIM ID. In the section 'Information/User Regulations', the group description is indicated after logging into the row 'AD Group'.
The people have now been added to the list. If you click on a person, you can establish the authorisations for that person in the lower area.
Click on 'Apply' to save the settings. Saving the rights can take several minutes under certain circumstances. Click 'OK' to close the window.
You can use 'Remove' to remove rights from selected people.
If you have entered rights for a person or group on the upper level of your drive, that person or group will see your release as a folder under the I: drive on the next day.
If the release is not shown automatically, the person to whom you have granted rights must still integrate the drive.
If you have shared a subfolder with someone, that person must indicate the path to your drive, including the subfolder, when they integrate the drive. Alternatively, you can also share with that person all folders above that subfolder, up to the desired subfolder (the right 'Display Folder Content' is sufficient for this).
Here’s how to protect a folder in Windows 10: